Thursday, October 27, 2011

Halloween Festiveness

I have to say, I just wasn't feeling Halloween this year.  Summer didn't start till September, so one month later I wasn't ready to pack it in and commit to all things black, orange and spooky.  That said, you know I can't let a holiday pass without getting my Martha on just a little!  So I had a couple little cheerful Halloween decor projects, nothing too effort-intensive.

Festiveness #1: Teeny Bat Pumpkins
 
This really WAS a Martha project, I copied it straight out of Martha Stewart Living.  (Right before the best pot-roast recipe and just after the article on how to arrange moss.  Just kidding!  Actually, maybe not!)  But the whole shebang took 10 minutes after procuring said tiny white pumpkins.  And look how cute!
The instructions are as follows.  Get some tiny white pumpkins.  Cut wings out of black construction paper.  Glue them on with Aleene's Tacky Glue (no, don't cheap out on other craft glue, Aleene's got your back and everyone else sucks!)  Admire the cuteness.

Festiveness #2: Leaf Garland
This project was of my own conception, which is why it maybe looks a little less...polished than some of my Martha crafts.  I was inspired by a fall bucket list I saw which had "Make Leaf Art!" as an item.  I don't know if you have seen some of the leaves change color this year, but it's been pretty epic around Green Lake for sure. 
En fuego!  So gorgeous!  When I was in college, I had never really seen the leaves change.  (What? I grew up in an evergreen forest in Oregon.)  When the the sweet girls on my freshman hall saw how amazed I was by all the yellow and red that nature could provide, they used to collect the prettiest leaves they'd see on campus and slide them under my door for me to discover when I got home.
So worth trying to immortalize, right?  So here was my funny little craft.  I was attempting to go for a bunting look, but in leaves.  It wound up looking like a 5th grader's fall project, but whatever.  Think bunting.
Instructions: collect 20 of the prettiest leaves you can find.  Flatten them under some books for a couple days while you forget about the project.  When you remember, pull them out and cut out pieces of fusible interfacing the same shape as each leaf.  (Fusible interfacing is what makes your collars stiff.  It can be procured at any fabric store.)  Iron the interfacing onto each leaf.  Press them under books again until they're good and dry.  If any of them become disattached from their interfacing, apply Sister Aleene, you'll be good as gold in no time.  String them onto yarn, and hang somewhere festive.

I hung mine above the door at a height appropriate to a 5'3" person.  Then I realized I had a 6'2" person coming to dinner and I got back on the chair and rehung them.  They do make the porch look a little more welcoming though, right?

Festiveness #3: De Rigeur Jack O'Lanterns
It isn't Halloween without jack o' lanterns no matter how bah humbug you're feeling.  We always have a lot of pumpkins because we have to entice trick or treaters up our long and daunting stairs!
This was our set this year:
Yes, that's four normal scary faced pumpkins on the left.  But my favorite are the two on the right.
I'll spare you the totally disgustingly cute story of these two pumpkins, but it was a "gifts of the magi" moment.  I carved the one on the right for the hubs as a surprise and he carved this one:
As a surprise for me.  Yes, it is a house with a door that actually rotates on toothpick hinges.  (Yes, we are nerdy engineers.)  
So that is the extent of the Halloween decorating, but those three projects go a long way towards making it feel like fall in our little home.  Do you have any Martha fall projects up your sleeves?  Do tell!


Monday, October 24, 2011

The Road Ahead

This post also could have been titled "A Million 'Befores'" or "My Not-so-secret Shames".  I loooove a good before-and-after.  They're always my favorite part of ApartmentTherapy or Young House Love or any of the other home blogs that keep me trucking through this renovation.  However, I suck at actually remembering to take "Before" shots.  As I've mentioned before, I tend to be very focused on DONE.  Done is my goal and I'm liable to jump in with both feet on a project, before immortalizing the awfulness that spurred me on to the project in the first place.  So, I'm doing a "before" roundup.  We've got a lot of projects on the docket, and hopefully some of these will turn into "afters" before long!

#1: Sort the Craft Room.
The craft room actually looks quite charming when you're in it.  It's hard to photograph due to it's diminutive size, but it really is cute.  However, every time I take photos of it I'm reminded how many THINGS are in it and how much that stuff could stand to be sorted/neatened.
This is the pile under the sewing bench.  Clearly could stand some improvement.  Those bins are under there because the built-in shelves already look like this:


A certain amount of clutter is required, as it wouldn't be a craft room without craft supplies, but I really aspire to improved and beautiful organization.  I think the problem with this project is that it is probably best done in small doses.  Which, as a done-centric person, seems beyond the realm of possibility.  I'm going to give it a shot this weekend though, I'll keep you posted.

#2: The Pass-Through
The pass-through is this odd little opening between the two sides of the house.  There is a door in it that leads to the basement...but the stairs have been removed so the door opens onto a hole filled with ductwork.  We cut this hole last year, so it still looks like what it is: a jagged hole in the wall.
This project will require every ounce of the husband's carpentry knowledge in order to look decent.  This is not a job for the wifey, unfortunately.  I may tackle some of the easy things like painting the door.  But this project is slow because there are so many questions.  How do we cover up the creepy brown linoleum floor and make it blend into the linoleum on the other side, with no budget and no skills with linoleum?  Do we want to do a built-in bookshelf in the pass-through wall?  Do we want to attempt a pantry in the hole behind the door?  How do you put trim on a surface that is just the edges of two sheets of drywall that have been stapled together?  Tricky!
#3: The Window Seat
This is one that is more of a luxury than a need.  (But there's still gotta be a before pic, right?)  We have the good fortune to have two beautiful bay windows in our house, (yay Victorians!)  In the one that is in the dining room, we're planning on installing a window seat that looks out on the street. 
It's a bit of a lumberyard right now, so a sub-goal is to finish re-flooring the porch so the wood can get out of the dining room.  Some better bike storage might not be a bad sub-goal either.  (City dwellers, what do you do with your bikes??  Why is there such a lack of good storage solutions?)

#4: The Basement
I try not to beat myself up about this one too badly because I know it is the bane of homeowners everywhere.  And I just moved!  (OK, a year ago.)  And we're still renovating!  But truly, the basement is a filth pit.  Check it:
 
And that is actually an improvement over how it was a year ago.  This side too:

The husband actually worked hard to get that section to where it is now.  I know it still looks a bit like an episode of Hoarders...
But if there's ever a worldwide paint shortage we're totally set:

But hey, we're fortunate to even have a basement.  I'm grateful for the storage, I just can't wait for it to be organized and clean.

So there.  In the interest of keepin' it real, all of our secret shames laid out for the world to see.  Hopefully, this is making everyone else feel better.  A.k.a. don't live in a house with a jagged hole in the wall?  Pat yourself on the back!  Excellent work!  We'll get there, and someday we too will live in a house with real walls and well painted molding.  Can't wait!

Friday, October 21, 2011

Gotta Have a Goal

"Cause ya gotta have a goal.  Do you have a goal?"  "Well I always wanted to be in the Ice Capades..."  C'mon, what movie??  Although I'm not Julia Roberts, I also have goals. 

These are my house goals for October/November.  I realize we're already 2/3 through October, but we've been working on #1 for two months now so I'm reeeeeally hoping we'll get it done by month's end.  Also October/November is a great home improvement time block because no one wants to be working on the house around the holidays.  And, once it gets cold, no one wants to be in the shop.  So:

Goals for October/November:
- Finish molding (getting so close!)
- Photograph historic newspapers inside History Wall downstairs for reals.  (Subgoal: find a friend with a really nice camera to come over and help us preserve the 100-year-old-wallpaper in our walls.  Any volunteers?)
- After photographing, put up insulation and drywall the History Wall.  (I know, sad, but it will keep the paper intact for the next person who tears down our crappy drywall job.)
- Do something about the pass through.  (What?  You didn't want this ragged hole in the wall there forever?
 (Yes, it still looks pretty much just like that.  Well, we moved the stereo cable...)
- Try sanding down one window with crappy chipping paint and try repainting it myself.  (This is going to be the trickiest, because I have to live up to the hubs' professional standards!  I'm looking forward to the challenge.)
- Get siding on the back of the house and hopefully reclaim a little of this deliciousness:
Hello Victorian, nice to see you.  Let's be friends!

OK, that's a lot of big goals.  We'll see how we do.  Do y'all tend to over-goal?  Do you ever achieve all of them?  Wanna do an over-under on whether we accomplish all these?  (I'm giving us 20:80, but I'm going to try real hard!)


Wednesday, October 19, 2011

Molding Madness Midway


I have a serious pet peeve.  Lack of molding.  I am a judgemental S.O.B. when it comes to not having any molding.  I think it comes from going to so many people's "in-progress" houses when I was little.  Out in the country, "in-progress" is practically a style movement.  When I told my mother that my pet peeve was molding, she pointed out there still isn't have ceiling or baseboard molding in the house I grew up in.  Hmmm.  Good point, Mom.  I'm sure Freud would have something to say about that. 

In any case, when we first put in the new windows I told the husband all about my lack-of-molding phobia.  He took it serious (dear thing), but a bunch of other stuff was actually pressing and somehow we've been living in a bedroom without molding for almost a year now.  It probably helps that the summer view looks like this:
All that greenery and sunshine is very distracting.  But if you look close, you can see the telltale stripe of foam insulation.  Ugh.  A closer look at the yellow heinousness?
So yellow.  So foamy.  <shudder>  I also have a foam phobia, but that's another story.  (Other than that, I'm not afraid of a thing, I swear.  I heart spiders.)

So after a long summery, sunny, delicious hiatus, we finally turned our attention back to our poor languishing house.  There are three major things on my to-do list right now, but molding is at the very tip-top of the list!  The first step in this arduous process was to make a tracing of the profile of the original period-appropriate molding found downstairs, take it to a custom molding shop, and promise our first born child in exchange for a custom molding knife.  Seriously, that stuff is expensive!  Once they have the tool made though, they can make a ton of molding for you, no sweat.  We had ours made out of really nice pine because the husband is a wood snob. 
(Ooh..So piney.  So profiley.  Such good wood grain.)

Once we had the molding itself made (which took about a month,) the husband lovingly cut it to length and then sanded down the areas where it would attach:
(Cue wifely freakout about scraping off the walls around the windows.  But he covered the bed and the duvet cover I love so much with so much care that I can hardly complain too much, right?  Repeat after me: "it must get worse before it gets better...")

Then finally everything was nailed in place!

WOOT!  Check it out in daylight:

This is the phase of the project where I cruise into the room every ten minutes just to ogle it and then gush about it.  Course, this phase is always followed by the interminable-sanding-which-cues-impatient-wife-teeth-grinding phase, which isn't pretty.  We're STILL not done, although we have moved on to:
Blue tape phase!!  OK, not quite as exciting as it sounds, but it IS exciting in that we are one step closer to having beautiful white molding that matches the rest of the room.  I know some of you bare wood people out there are going to freak out that we are painting it.  However, even the resident wood snob is resigned this time.  A.) the rest of the house has white molding.  B.) the rest of the room has white molding.  C.) no one is up for stripping the rest of the windows in this house (I believe there are 27.)

So there you have it, the molding midway.  Our goal is to be done with the whole thing by the end of the month.  What do you think about white molding?  Crisp and clean or go au naturel?


Monday, October 17, 2011

The Elusive Pink Chandelier


Sorry this post took forever, but I've been in China.  Did you know that China doesn't want the Chinese to read blogs?  So you can't actually get to your blog from China.  Weird.

Anyway!  Slowly but surely we’ve been making some early fall progress!  Woot.  First project up, the elusive pink chandelier.  I always joked that I didn’t want to cohabitate before marriage because I wanted to live in pastel girly heaven for as long as possible before marrying the manliest man on earth and accepting a life of masculine colors and a house filled with navy.  Luckily for me (although the sheets are now a lovely ecru,) I still have a pastel haven.  A.K.A. the Craft Room. 

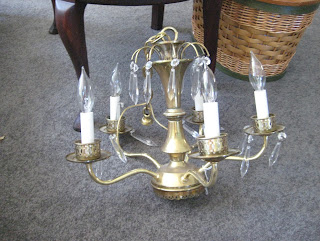
I am totally one of those delightfully spoiled ladies who have an entire craft room.  A tiny room that occasionally spits out intricately wrapped gifts, hand-made cards, lovingly sewn baby clothes, perhaps even a quilt or two.  The craft room has nothing masculine about it.  Unfortunately, when I moved in, the light fixture was a terrible plain globe set in horribly crumbling plaster, giving off the same amount of light as is found in your average prison cell block.  It had to go.  I had my heart set on some day replacing it with the perfect tiny girly chandelier that would just whirl into my life and magically install itself.  Then I ran into this beaut:
OK, less “beaut” and more “beast”, I saw some potential lurking in the brassy depths.  This lovely lady cost me $50 in the town of Renton, WA, home of SolidWorks training courses, awesome Indian food, and surprisingly wonderful antique stores.  My plan was to take this baby home, paint it pink and give my craft room the light it always deserved. 

I have to admit, painting is always the hardest task for me.  I am not detail-oriented enough to really complete something with as much perfection as it deserves.  Often, my excitement for the job to be finished prevents me from doing a good job on silly things like preparation.  I am all about the “done”.  So I raced home and spray painted that sucker pink!  Which flaked off in approximately 2.7 seconds.  Cue game show “wah wahhhhhhhhhh…”

OK, take two.  I sanded the whole thing down with some very light sandpaper furnished by the hubby, trying to remove the paint and the shiny finish without leaving giant gouges.  I carefully taped all the white “candles” and tried for coat #2.  Not looking too shabby, chandelier!
This process took a million days I swear!  No, that’s just the impatience talking.  The second time around it took two days, one day to prime and another day to coat with several light coats of pink.  I followed the advice of Sherri at Young House Love and tried to get 4 even coats (and “if you’re spraying, your arm better be a swayin’”) but it was still a little drippy in some small and unnoticeable spots.  I think I’ve still got things to learn about the mystical ways of paint.  However, I did manage to be detail oriented enough to go back and get a second can of paint when the first can ran dry.  This qualifies as major spiritual growth in my book.

(Sidebar on pink: the best selection of pink paint in Seattle can be found at the Maple Leaf True Value hardware store.  At the Greenwood True Value?  Zero shades of pink.  At Stoneway Hardware?  Two shades.  At Maple Leaf True Value?  SEVEN shades of pink.  Go Maple Leaf.)

With the final coat on, the husband helped me wire it in and screw it in.  Mostly because he’s tall.  Wiring it isn’t tricky, we turned off the breaker (ok we were scofflaws and didn’t actually do that but we should have) then we unscrewed the last light fixture, lifted it halfway out, took off  the turn caps on the wires, untwisted the old light fixture, gleefully threw it out the window (ok we didn’t do that either but we should have,) held up the chandelier, twisted the bare wires back together with the wires out of the fixture, put the twist caps back on, held up the chandelier and screwed it in.  Total piece of cake!  Getting the screws in was the hardest part since it’s an old mounting.  We then spent a billion years replacing all the crystals and….drumroll please…..
Ta da!  It’s everything I wanted it to be and then some.  It really makes the room look awesome and girly at the same time.
Taking this photo made me realize how far I have to go on sorting those shelves.  But hey, the light fixture fills me with joy, zestiness and hope for a new project.  It’s a brand new season and I can’t wait to see what else it brings!