Monday, December 10, 2012

Christmas Crafting 2012

This year's Christmas Crafting party was a hoot!  Last year I had the party the very day that I returned home from China and while that had certain advantages, like getting to see all my nearest and dearest all at the same time and getting to eat a REALLY bitchin' ham sandwich, it was also crazy.  This year much more chill and wonderful:
 
My friend Catherine really brought her A-game when it came to crafting this year.  Here she is, plotting with the lovely Mallory:
Working over some foam balls which shortly turned into this:
 
The cutest penguin ornament on the planet!  I think she followed this tutorial at the Craftberry Bush:
http://www.craftberrybush.com/2012/11/the-homemade-treefelt-penguin-ornament.html

Highly recommended for adorableness.  Catherine also taught us how to make these fabulous creations:
It's a snowglobe AND an ornament!  Whoa!  They're so easy.  Here's what you do:
1.) Find some clear ornaments that are plastic instead of glass.  (This might be the hard part.)
2.) Cut off the bottom of the plastic globe with an exacto knife.
3.) Trace the open circle you just cut onto a piece of cardboard or cardstock.
4.) Affix a figurine (or glitter tree, in my case) onto the center of the circle.  For extra pizazz, paint the figurine with mod podge and get your glitter on!
5.) Put the globe over the figurine and its base.  Hot glue the edge of the cardstock and the bulb together.
6.) Pull the ornament hanger end of the ornament out.  Using a funnel, fill through the hole with epsom salts until the level looks snowily appropriate.  Top with a little glitter for extra sparklitude.

Love it!  I opted for a gold glittery tree, but Catherine also suggested an Eiffel Tower might be nice, which I'm dying to try next!

I did a paper poinsettia in a hipster chevron print which turned out pretty cute:
And Kate made this super awesome gold holly but with jingle bells as the berries?  Love it!

As always, the social aspect of the party was just as fun as the actual crafting.  Check out the festive outfit my friend Laurel put together!
The holly corsage she wore is a little dark in this pic, but the red plaid tie is vintage, of course!

There was a lot of hardcore crafting this year.  Check out Robyn and Catherine at work:
When Catherine's not busy teaching us to make felt penguins, she's a SURGEON.  Eat your heart out Martha.

The party even spread out to the other side of the house (where you can see Megan crocheting a baby headband that she made in under an hour.  Gotta get the tutorial on that!)  Not sure what James is raising the roof about, but clearly some sort of paper craft is thrilling!
This year we had a couple of very wee guests.  Miss Magnolia Estelle was a hit in her hat with ears.
She looks a little nervous about her crafting prowess.  Not to fear, her lovely mama, Miss Anna is a long-time pro!

And in that amazing way that sometimes happens, THIS (pic from last year's crafting party, the DAY before she went into labor!):
Turned into THESE:

Whoa.  That happened!  Of course, Dana didn't get any less charming by becoming a mother:
Quite possibly the cutest chapeau that has ever been crafted at Christmas crafting!

That was one heck of a crafting party! Thanks to all my ladies for coming and crafting!

I'm posting this as my DIY Deck the Halls (cause boy did we deck some halls!), check out the other entrants here at NewlyWoodwards!

Monday, December 3, 2012

Ah Hello, Mrs. Cleaver!

I may be a 50's housewife trapped in a career girl's body.  I love to bake Bundts and play hostess.  Both of which are much more doable with some semblance of elegance if you embrace a critical piece of apparel; the apron.  The apron is totally under appreciated.  Get dressed up in your favorite outfit, then put on another accessory, then get as dirty as you want, then remove the accessory and go back to your favorite outfit??  Yes please!  Brilliant!

Aprons are so easy to make as gifts.  You cut the apron shape, trim the edges, sew on some ties, add a little decor and you have a perfectly adorable Christmas present.  Don't tell anyone, but I can usually turn out an apron in an hour or two.  So good for the hostesses (or hosts!) in your life.

I had a request this year for a brown apron, so off to Joann Fabrics I went.  You need a yard of canvas or heavy cloth, I use indoor decorating fabric which is heavy enough to be food-resistant, but not as stiff as some.  Then you need a couple packets of extra wide double-fold bias tape like this:
In whatever your trim color will be!  Super fun.  You need 4 yards of whatever you want to make the ties from.  In this example, I use an awesome brown grosgrain ribbon.

First, cut the apron shape.  I used a previous apron to pencil out this one, but you can freehand it.  This one is going to a very petite person so the top isn't too big, but there's a fun scallopy bit at the bottom:
Then pin on your bias tape as the trim all the way around:
Then sew it on.  Cut two matching lengths of ribbon for the neck and two for the waist and sew those on.  You can leave them long and trim them when you put it on for the first time.  
Ta da!!  I added a ribbon bow as the decor on this one because it was just oh-so Mrs. Cleaver.  But it might be too campy?  (Is there such a thing??)  If I get ambitious I may add a pocket?  We'll see.  But for now, I think Mrs. Cleaver would approve.
Happy DIY Monday!  See the other entries here at Newly Woodwards. 
 

Monday, November 26, 2012

A Snuggy for My Wine

It's no secret that I love fabric.  Beautiful colors or kitchy prints get me every time, and I'm always looking for something to do with the little scraps of fabric I have left over from a project. At the same time, when I entertain, I'm also always looking for a way for our guests to identify their drink.  So I put those two things together and whipped up this little craft which might come in handy during the onslaught of holiday drinking.

I'm calling it "A Snuggy For My Wine".  The finished product looks like this:
It's a combination coaster AND wine identifier.  Brilliant, or as tacky as wearing a Snuggy in public?  Hard to say but at least I won't have to chase my guests with coasters!  I switched up the fabric:
So hopefully everyone will have a unique color combo for their glass.

This is the simplest of all crafts.  You melt some fusible interfacing onto the back side of your fabric.  Then trace your wine glass onto the fusible interfacing.  Add a slightly larger circle to make room for the seam allowance.  Cut one circle for the bottom and one for the top.  The one for the top should be cut totally in half, and then cut again at right angles right down to the seam allowance (otherwise you won't get it on the glass.)  The top pieces can be seen in the bottom half of the photo below:
 Then put the top pieces and the bottom piece together and whipstitch along the the edge.  I tried using metallic thread which was snazzy but made the stitches uneven.  Oh well.  One must sacrifice for beauty, right? 

Check out all the other DIY: Dare to Entertain projects here.

Happy Thanksgiving tout le monde!  On towards Christmas!

Monday, November 19, 2012

Dare to DIY: Being Thankful

I joined the "Dare to DIY" challenge from fellow blogger NewlyWoodwards.  A little creativity always eases the change in seasons for me.  Four themed crafting challenges spread out over the season?  Perfect.  Sign me up and hand me some glitter!  Glue guns: ready, aim, fire!

That said, this week's craft got stuck in a five-hour airport snafu.  Yeah.  So suddenly I wound up crafting at the airport.  Aside from the bad lighting, it was great.  Five hours to let creativity run wild.  And with limited supplies at hand, it got a little weird, but hey, I don't think I would file it under SWHW (something went horribly wrong), so let's just call it a success!

This project was inspired by a post I saw last year at Young House Love (see it here.) This project is all about notes of thankfulness shared with your family (or in my case, husband).  I bought some cute letterpress thankfulness cards from PaperSource.  In the future, I could totally print or press these myself (or lasercut them, yay engineering employer!) but this year, easy is my favorite word.  I got two kinds:
I filled them out.  I'm keeping the actual deets of the thankfulness private, but writing 12 notes of thankfulness was pretty easy.  My life partner is rad and funny.  I'm a lucky lady.

Once the notes were done, I wanted to make a cute container.  I had all sorts of earlier notions but once stuck at the airport I had watercolor supplies and a sewing kit.  Envelope?  Yeah sure!  It's slightly nostalgic of the elementary school valentines-in-a-folder thing, right?  I've been taking a watercolor class and although I kinda still suck at it, I love the dreamy colors.  So for this project I went with a house and love motif:
Hey not bad for an airport craft, right?
I sewed the edges closed with my travel sewing kit.  While this isn't the most amazing thing, it's done, it's sweet and hopefully the hubs will at least appreciate a little hilarious creativity in his life.

Check out the other crafts here:

Sunday, November 18, 2012

Fall and Friends

I think I post every year about the same dang trips, but we have lots of wonderful annual traditions!  Harvest Fest is one of my childhood throwback favorites.  This year was pretty much the same as every year, but we got some added time with my high school friends thrown in.  I love these girls:
I know, we're ridiculous.  But fun!  We did a little craft bazaar hopping (yes!) and then we went to do some pumpkin picking:
Que-Sara and I and our pumpkins:
The husband takes the pumpkin ferrying VERY seriously:
Every year the pumpkin patch puts on "Pumpkin Funland", an extended pumpkin diorama, and it's always themed.  This year was "London Olympics" themed.
Very clever really, here the hubs and I in front of the Beatles!
And just because no post is complete without a pic of my husband being adorable and hilarious:
I think he's amazed by the gourds.

But best of all was the weather.  I went for a run one day and the road looked like this:
The views looked like this:
Why don't I live here all the time?

At my parents' house I got my annual muse on with the media of leaves and gourds:
And appropriately enough, we saw this while leaving:
The most vibrant double rainbow I've ever seen in my life.  This is what the whole weekend felt like.  Thanks ladies, pumpkins, Hood River and fall!  We'll see you next year!

Sunday, November 4, 2012

Fall Camping

Brunhilda (our VW Vanagon) is enabling all sorts of camping that previously would not have been attempted.  Exhibit A: fall camping on the Olympic Peninsula!  We wanted to go visit my parents while they were working in Forks and we agreed to meet at Lake Crescent. 

We had a slight adventure to start out our trip, wherein a campground that we had thought was open turned out to be closed, so in the middle of the night we fetched up in a lovely lakeside parking spot...only to be woken up at 8am by a park ranger pounding on the door of the van.  Oops.  Nothing like a run-in with the law to get vacation started right.  But she was perfectly friendly, asked us nicely to get a real campsite next time, and left us to get out of our jammies before setting off. 

Run-in with the law aside, the campsite was spectacular.  The view from the van looked just like this:
Totally worth it.

We met my parents at the Lake Crescent Lodge for lunch on the sunporch.  The Lake Crescent Lodge looks like someone went back to the 1920's and pulled every adorable summer-camp trick they could find.
   
My mom is recovering from a horseback riding accident, but luckily my mother-in-law knit her this adorable cast cover, so she's still fashion forward, non?
 After lunch, the husband and I rented a canoe and went across the lake.  Canoeing is a new sport for me and I LOVE it.  Love it.  Look at this face:
That's exactly how i feel on the inside when I'm canoeing.  Something about the old-timeyness of the craft and being so close to the water yet not as scary-close as a kayak really does it for me.  Love it. 
 It's my new favorite adventure.  Maybe Santa will bring me a canoe?  But how would I haul it on my trusty Beetle??  Hmmm.

Till next time, mon amour Monsieur Canoe!


Tuesday, October 16, 2012

Let 'er Buck!

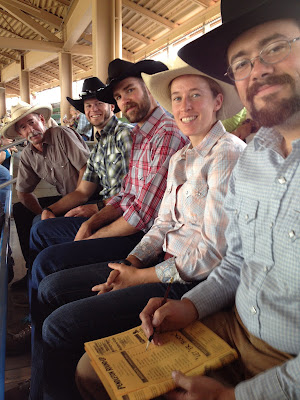
I still love our annual tradition of the Pendleton Round Up.  It's just so...wholesome?  No, there's lots of drinking and carousing and beef involved, so wholesome is not the right word.  Down home perhaps, but in the best sense.  This year, we had some wonderful friends come with us, so we had quite the good looking crew.  Here we are watching the rodeo during the day:
And catching some entertainment at night:
(I know all of those people on that bench.  So fun.)  Speaking of fun, if you're my parents, the street entertainment always provides lots of opportunities for dancing.
 Aren't they cute?  Such a sassy coral dress on Mamacita!  As for us, lets not lie, the evenings usually contain a fair amount of adult beverages. 
But hey, we had clearly imbibed WAY less than this guy:
The back of his fairly dirty shirt reads "If Found, Send to the Hut".  The Hut is a dive bar on the outskirts of town, and not a bad place to have your unconscious body sent back to.  In chatting with him, it became evident that he had no idea that the back of his shirt read something so useful.  He told us he was from Kansas and that was about all we could understand over the slurring.  Good times!

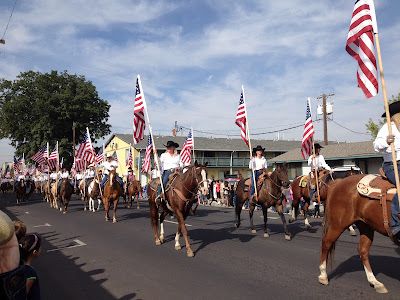
There's a wonderful non-motorized parade on Friday morning.  ALL horseback all the time.
I love a whole town on horseback!
Beautiful.  

So that's Round-Up for another year.  As they say in Pendleton, Let 'er Buck!